Because of the great feedback from the german pinball community, I will add a FAQ to that project:
Files on the sd card
The sdcard has a FAT32 (windows) partition were all data files are located:

Inside the data directory the TILT!Audio* process writes a logfile for each run and holds up to 4 logfiles, before they get deleted. Logfiles are useful for finding problems / debugging.
For the sound sets there is the directory „sound“. Inside each sound set has is own directory starting with „1“, „2“ …
Key File
If you have a license file or key file, just put it into the data directory.
Using USB sound
If you are using usb sound devices with build-in sound you need to place a file „use-usb.txt“ in the data directory. This is only needed for Pi models with internal sound interface (build-in 3.5mm jack). Update: also use for pi zero.
Categories
Sound effects are in one of 5 categories: music, voice, sfx, jingle, single. Depending in what directory you put the sound effect playback behaves different.
- music: contains background music that gets played in the background
- sfx: effects the gets played while background music is still running
- jingle: short music clips, that interrupt background music. background music is resumed after jingle stopped.
- single: as jingle, but music doesn’t resume
- voice: voice effects that are also mixed in while background music is playing
Sound effect directories always starts with a 6 digit nummer and a dash like „000017-game_over“. The name part after the dash is up to you, TILT!Audio* uses only the 6 digit number. Its the ID of the sound effect. The ID must be unique for a sound set. Additionally the file name in the folder can override the ID. So if the file itself starts with a number like „0000122-foo.ogg“ 122 is pulled as ID instead.
First there is a global config file: raspisound.ini. This file controls settings that are common for all soundsets. Supported settings:
say_version=0/1
say_preload=0/1
play_boot=0/1   # since version 1.5, skip boot sound
preload=0/1     # since 1.5, controls sample preloading in memory
vendor=0-5      # 0=dataeast, 1=wpc, 5=wpcdcs
log_level=0-4   # 0=nothing ... 4=debug
sample_pool_size=<size of poolsize in MB>
preload_threshold=<size of sample in byte> #if bigger, do preload
attract_timeout=<time in ms until fade out>
shaker_active_low=0/1 # if set invert shaker control: LOW->ON
suppress_repeated=0/1 # if set, repeated commands asking for the same sample are suppressed
All these settings are optional, so the raspisound.ini file itself is also optional. say_version, say_preload and play_boot options speed up the boot process as a couple of messages are skipped. Also if you switch off preloading of samples in main memory, the startup process is a lot fast, but in contrast the first use of a sample has a short delay, because it needs to be loaded first.
Sample pool size controls the amount of memory that is used for preloading sound into ram. If you use a pi 3 normally all sample should into main ram without any problems.
Next there is the per sound set configuration file: config.ini. It is also optional but can contain some useful options like:
- ducking_voice=0-100
- ducking_sfx=0-100
- ducking_jingle=0-100
- dunking_single=0-100
- gain_music=1-30
- gain_sfx=1-30
- gain_voice=1-30
- gain_single=1-30
- gain_jingle=1-30
- fade_sfx_on_music_change=0/1
- fade_sfx_on_music_change_time=2500
- shaker_enabled=0/1
The first „ducking_xx“ settings controlling the „ducking“ or lowering of the background music when a sample of a specific type is played. e.g. if ducking_voice is set to 80 this means that background music volume is lowered to 80% while voice callouts are playing.
The „gain_xx“ settings control the overall weight of the sample types for this sound set.Gain settings range from 1 to 30, where 15 is the default. So if you want sample type sfx louder go above 15. So if you want to have voice louder compared to background music, you can e.g. set gain_music=11 and gain_voice=24. This was formerly achieved by putting a gain.txt (see below) file in the respective subdirectory itself, but its now consolidated in one ini-File.
As soon as the sample is over volume of background music goes back to 100%.
fade_sfx_on_music_change / -time controls wether on background music change a running sfx is faded out or not. Additionally you can also set the fading time in milli seconds. There are soundset that use rather long sfx samples, so it makes sense to fade the sample until the music track changes.
Descrambling hashes
There are a couple of sound mixer available that are using scramble hashes in the filenames. You can recognize this by the big random like numbers in the file / directory names. If your sound set is like that you need a lookup file to descramble the hashes and map them to the IDs of the real pinball machine.
The file should be placed in the sound set directory itself and named „config.raspisnd„.
You can check in the download section, if there is already a mapping available for your machine.
Update for version 1.9 and up
For all newer firmware version all the per sound set specific settings are consolidated in one single config file, which is the „config.raspisnd“ file. So this file can (and should) not only contain the hash mappings but also the settings that where in config.ini before. A complete config file will then may start like this:
ducking_voice=65
ducking_sfx=90
gain_music=13
gain_sfx=16
gain_voice=28
gain_jingle=11
gain_single=15
# generated from jp-ost-mapping.txt
# first 4 digits are sound id in hex, next number ... decimal
0000 3411162208
0001 1664737660
0002 1027117153
...
As you can see its starting with the setting from config.ini above and the continues to covers all ID mappings all in one file.
Sound effect directories
Like described above sound effect directories always starts with a 6 digit number and a dash, that defines the ID of the sound effect.
The sound effect directory can hold up to 10 sound files (ogg, wav, mp3) that are played when the pinball machine sends a „play sound <id>“. If there is more than one sound file per effect, one get chosen randomly.
Additionally to sound file TILT!Audio* recognizes a few „control files“:
- gain.txt: if found it contains one line with a number 1-30 that increase or decrease the volume of that sample. 15 is the normal volume.
- shaker.txt: contains one line with a sequences of numbers for shaker control (see below)
-
dontpreload: if this file is found the sound effect never gets preloaded into ram.
Shaker control
If a shake.txt is associated with a sound effect, a sequence of shaker on / shaker off commands is replayed along with the timing read from „shaker.txt“. E.g. a line of „1000 500 1000“ means turn shaker on for a second, the off 500ms and finally on again for 1 second.
Shaker must enable in general for each sound set in the config.ini file.
Connecting the Pi
If you like to connect to the Pi directly on the console, connect via ssh and use the username pi, password is pi. If you need to have root access, the root password is also root.
Debugging
As mentioned above each run produces a logfile the can be found in the data directory. It contains a lot of useful information that records what has happend while playing. it look like this:
2017-03-06 20:37:41 INFO [main] [despi.c:270] TILT!Audio starting, version 1.10, serial: 999826805
2017-03-06 20:37:41 INFO [main] [despi.c:275] loading settings from .pisound
2017-03-06 20:37:41 INFO [verifyKey] [crypt.c:205] trying to load key from /boot/data/999826805.key
2017-03-06 20:37:41 INFO [verifyKey] [crypt.c:225] license verified capabilities 0x01
2017-03-06 20:37:41 DEBUG [playSound] [sdl_sound.c:365] play sound: sounds/boot.ogg
2017-03-06 20:37:44 DEBUG [playSound] [sdl_sound.c:365] play sound: sounds/version.ogg
2017-03-06 20:37:45 DEBUG [sayNumber] [sdl_sound.c:395] buf: 1, len 1
2017-03-06 20:37:45 DEBUG [sayNumber] [sdl_sound.c:399] play: 1.ogg
2017-03-06 20:37:45 DEBUG [playSound] [sdl_sound.c:365] play sound: sounds/1.ogg
2017-03-06 20:37:46 DEBUG [playSound] [sdl_sound.c:365] play sound: sounds/point.ogg
2017-03-06 20:37:46 DEBUG [sayNumber] [sdl_sound.c:395] buf: 1, len 1
2017-03-06 20:37:46 DEBUG [sayNumber] [sdl_sound.c:399] play: 1.ogg
2017-03-06 20:37:46 DEBUG [playSound] [sdl_sound.c:365] play sound: sounds/1.ogg
2017-03-06 20:37:47 DEBUG [sayNumber] [sdl_sound.c:395] buf: 0, len 1
2017-03-06 20:37:47 DEBUG [sayNumber] [sdl_sound.c:399] play: 0.ogg
2017-03-06 20:37:47 DEBUG [playSound] [sdl_sound.c:365] play sound: sounds/0.ogg
2017-03-06 20:37:48 INFO [main] [despi.c:309] licensed for: ralf.ricker@osnanet.de, capabilities: 0x01
2017-03-06 20:37:48 INFO [searchSoundSets] [despi.c:175] searching for soundsets at: /boot/data/sound
2017-03-06 20:37:48 INFO [searchSoundSets] [despi.c:186] found soundset 1 at: /boot/data/sound
2017-03-06 20:37:48 INFO [main] [despi.c:323] max soundsets: 1
2017-03-06 20:37:48 DEBUG [readSoundConfig] [sdl_sound.c:251] read config from /boot/data/sound/1/config.ini
2017-03-06 20:37:48 DEBUG [readSoundConfig] [sdl_sound.c:255] ducking for JINGLE: 60
2017-03-06 20:37:48 DEBUG [readSoundConfig] [sdl_sound.c:259] ducking for SFX: 80
2017-03-06 20:37:48 DEBUG [readSoundConfig] [sdl_sound.c:263] ducking for VOICE: 50
2017-03-06 20:37:48 DEBUG [readSoundConfig] [sdl_sound.c:267] ducking for SINGLE: 90
2017-03-06 20:37:48 DEBUG [scan] [sdl_sound.c:203] gain for /boot/data/sound/1/voice is 15
2017-03-06 20:37:49 ERROR [getFirstAudioFileFrom] [sdl_sound.c:166] cannot find audio file in /boot/data/sound/1/voice/000185-have_a_nice_day
Starting TILT!Audio* from a shell / terminal
For testing you can stop the background service of TILT!Audio* by logging in to the pi as root using a terminal or if you have network running via ssh. Default password for the user pi is pi and root for root (you can and should change this as soon you connect the first time).
Stopping the background service is done by:
systemctl stop pinsound
The you can run in testmode:
/home/pi/despi/despi /boot/data/sound
or with debug option set like this:
/home/pi/despi/despi -d /boot/data/sound
if you use an external sound card (usb sound card) do a
export AUDIODEV=hw:1,0
first. NOTE: for Raspberry Pi Zero the only option is to use USB sound, but in contrast to Pi 3 USB sound is still recognized as card0, so no special AUDIODEV environment variable needed for Pi Zero.
When in debug mode, TILT!Audio* accepts a couple of keyboard commands like:
- numbers followed by ‚p‘ to play the sample with number …
- ‚q‘ to quit
- ‚+‘ or ‚-‚ to incr. or decr. volume
- ’n‘ or ‚m‘ to switch to sound set 1 or 2
Update
To update the TILT!Audio* firmware you need to place an update package into the update directory of the sd card. in order to get recognized by the automatic updater, the update package must be named „update.zip“.
After file has been copied, restart the raspberry pi and update should happen automatically. If you look into update directory after pi restart, the update.zip should be renamed to update-done.zip. This indicated, that the automatic updater has picked up the file and done the update.
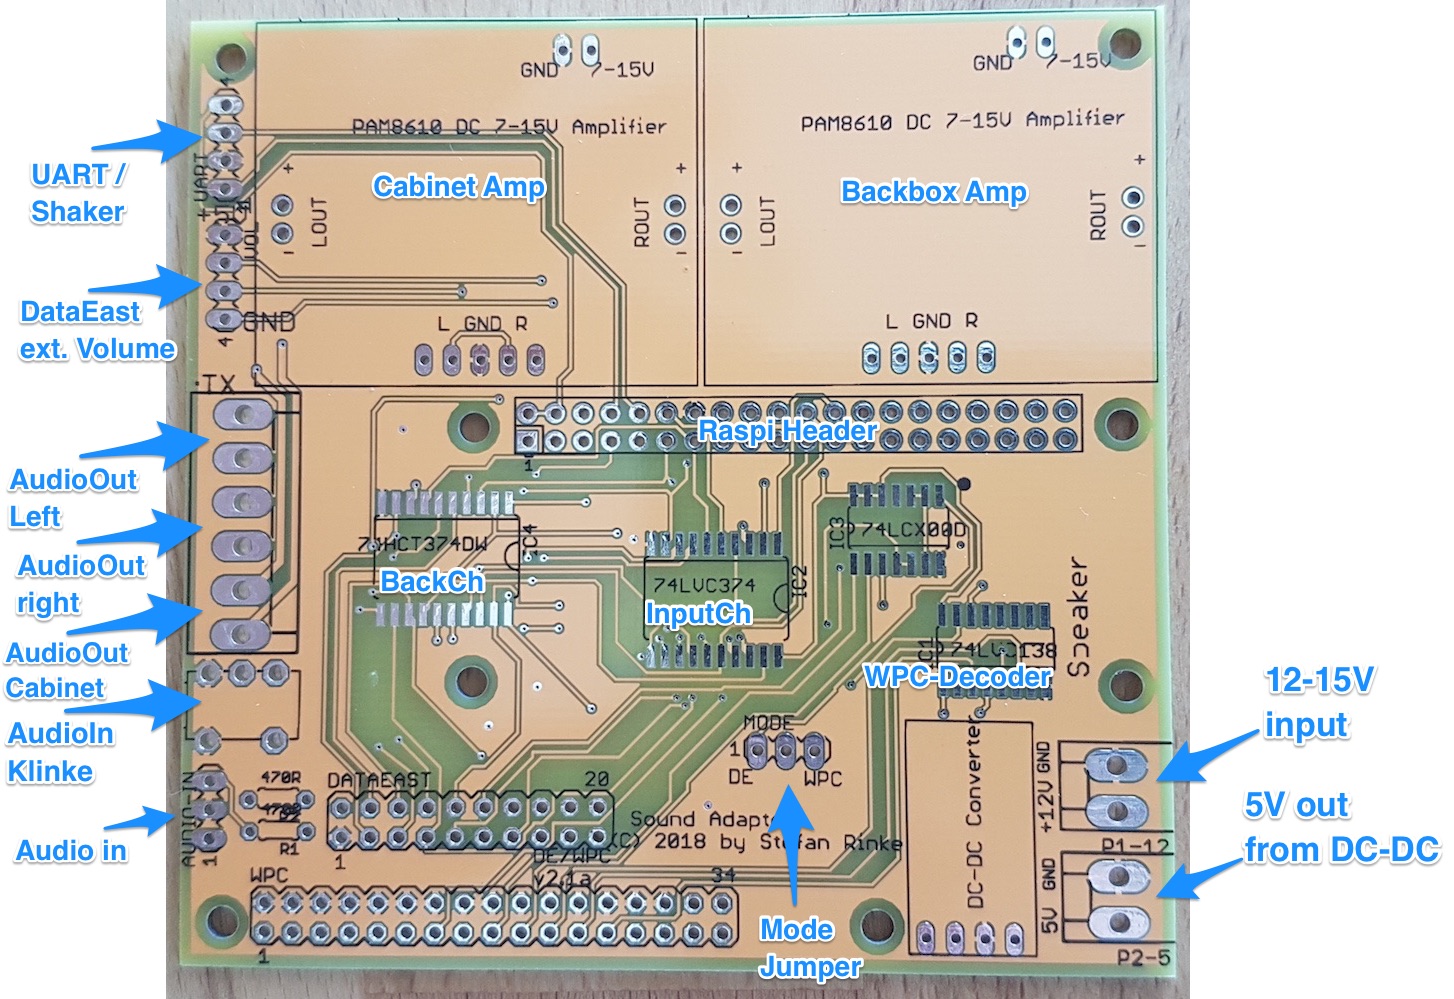
Assembling kits
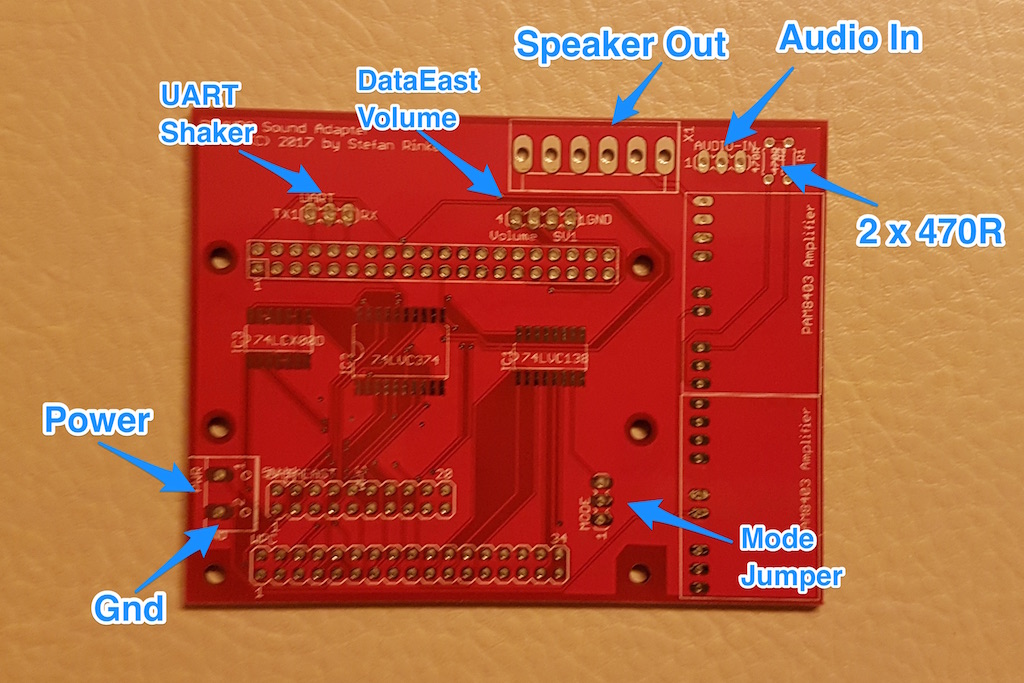
The picture above describes the various connectors for the PCB:
- mode jumper: selects whether to use DE (short between 1-2 / lower) or WPC (short between 2-3 / upper)
- Power: +5V input power, lower terminal is ground.
- Audio input: 3 pin input for the on board amplifiers. middle is gnd, left is left and right is right 🙂
- 2 x 470 ohm resistors on the top right
- 6 pin Speaker out: from left to right: Cab-, Cab+, L-, L+, R- and R+
- DataEast Volume Control: for data east you can install a rotary encoder with button, that replaces the volume control in the cabinet. Gnd is right (pin 1)
- UART / Shaker: extension connector for either UART output or shaker. Actually only shaker is supported. Shaker control is connected to pin 1 / TX. Be careful not to overload TX / pin 1 (directly connected to GPIO of the pi). You need to have a relay switch in between.
Remark: for DataEast IC1 (74×138) must be left blank.
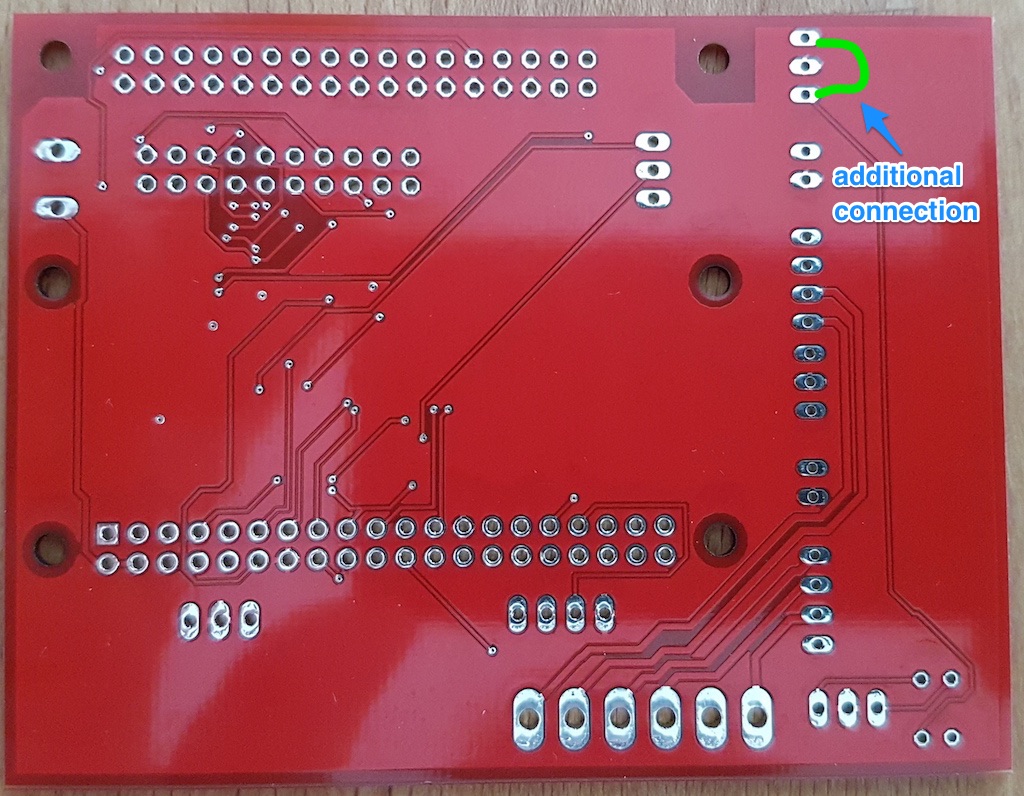
Note: on the bottom side, there is one additional connection needed (only for rev 1.9). Was fixed in rev 1.9b and newer.
Connections / Assembly for 2.x Board
Picture:
The board come with a DC-DC power converter that creates to 5V for the PI out of the main power supply 12-15V (right connector). So the 5V connector on the left in normally not needed. You could use it, if you have some small additional 5V load.
Power supply should be >3A (~40W) depending on the power output you expect from the amplifiers.
For DataEast there is an additional connector (DataEast ext. vol). This could be used to provide and external control for volume and sound set switcher. This is generally not used for WPC as volume is controlled by the main cpu.
If you want to provide a external volume controller you need to connect a rotary encoder with push button like this one.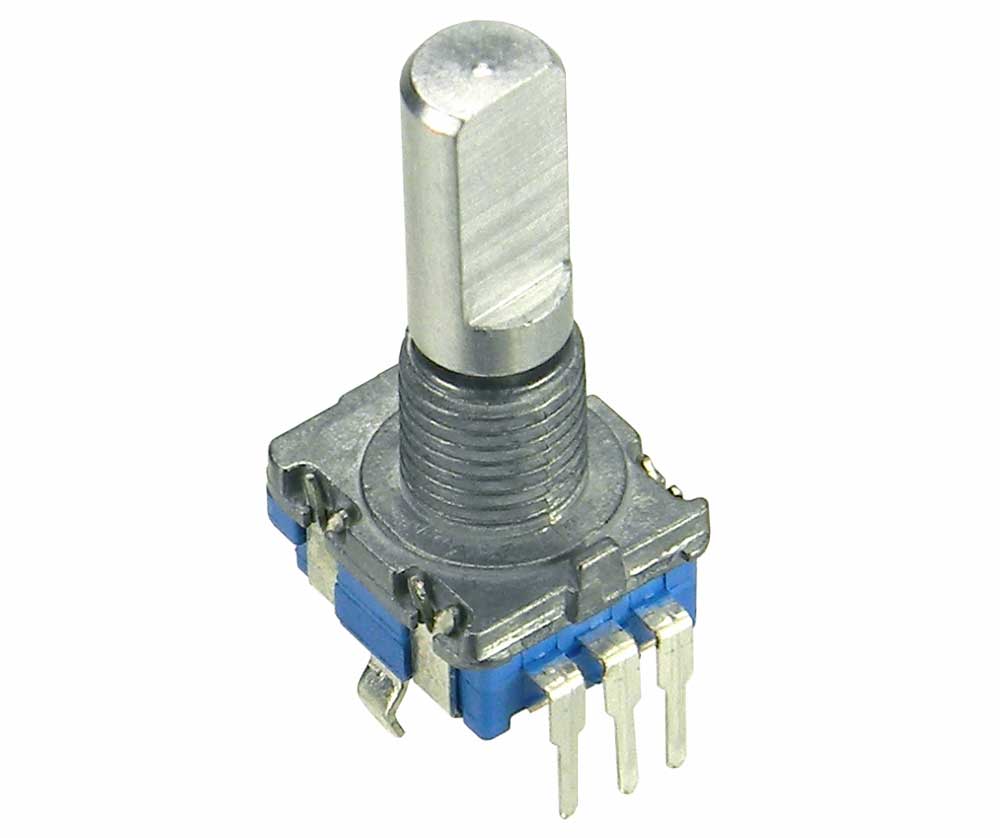
Connect GND to pin 1, a,b to pin 2,3 and push button to pin 4.: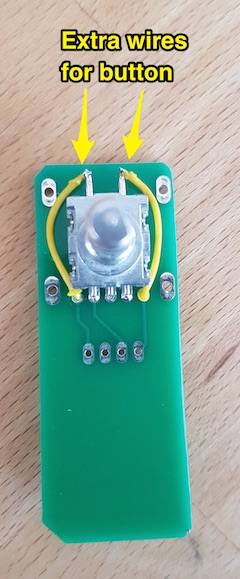
Unfortunately the small mounting PCB that I provide with the data east kits, does not match the pinout of the currently available rotary encoders. But it is easy to work around with two additional wires
The PI’s power supply is done via GPIO connector, so no extra power supply needed for the PI.
Depending on what PI your’e going to use, you need for:
- PI3 place a female header with long pins UNDER the shield / PCB.
- PiZero place a normale female connector on top of the PCB and the male pin header for to PiZero under the Pi.
Or to say it easy: the PiZero sits on top of the PCB, Pi3 underneath. Also for Pi3 be carefule not to create a short if the PCB is touching the PIs USB / ethernet outlets. Safest is to put and isolating strip in between.
BackCh is not used so far, so IC4 (BackCh) will be unpopulated.
Connections / Assembly for 2.1x Board
Rev 2.1 was better optimized for PiZero (more space for USB connectors). All other notes from 2.0 revision stay valid.
*TILT!Audio is the new name for RasPiSound
Hi there Stefan
First of all, i have to say a very big THANK YOU for all the work you are doing for the pinball community, adding lots of new features to our beloved old DE and WPC machines. Your projects are awesome to say the least!!
And then next up i have a couple of questions for you if you don’t mind. I guess you are really busy, but i will give it a shot anyways.
1: Raspinsound hardware: If i buy the 1.9 kit plus a license (http://go-dmd.de/produkt/kit-v1-9-fuer-raspberry-pinball-sound-projekt/) do i need anything else other than the PI and a SD card to replace my existing sound board and start playing with new sounds? Do i need a power supply , or is power taken from the existing wires in the WPC machine? And if i need external power, is it only 5V for the PI, or do i also need 12V for the amps?
2: I have an existing modded sound mix for my STTNG (http://pinsound-community.org/forum/index.php?/files/file/223-sttng_ultimate_by_pinballsharkzip/) but this mix has the ID’s hashed. Do you know of any way to „un-hash“ these? Or do i have to do it all manually based on the filenames? This will be virtually impossible as a lot of them are the same (like „main_theme“)
3: If i just want to start by using the original sounds, how do i get these? Lets say i want to use a raspinsound for my Williams IJ, how do i get the unhashed sound mix ready for me to use and modify? Is this even possible?
Hope to hear from you soon, as i would really like to get started with a Raspinsound 🙂
Best regards
Michael Jensen